
How to Vacuum Seal Garden Produce
A good harvest often arrives all at once, and a vacuum sealer is one of the most useful tools for packing it away so the quality you grew stays intact. The Harvest Company sees sealing as the last step of the growing season, because a clean seal protects the work that came before it.
Good results come down to three things: prepping the produce so it is clean, dry, and ready for the freezer, sealing it with a clean edge, and keeping every sealed bag in the refrigerator or freezer.

Removing the air does not make fresh produce safe at room temperature. A vacuum-sealed bag of garden vegetables still belongs in the refrigerator or the freezer, just like an unsealed one.
Tomato pieces, berries, and other tender produce can crush under vacuum pressure. Spread them on a tray and freeze them until firm, then seal them so each piece keeps its shape.
Where a sealed bag should go.
Both are cold storage. The right one depends on the produce and how soon you plan to eat it.

From the garden basket to a clean seal.
Six steps, in order. Each one helps the bag seal cleanly and the produce hold its quality.
Start with fresh, undamaged produce
Pick produce at its peak and use it soon after the harvest. Wash it, trim away bruised or damaged spots, and cut it into even pieces so each bag packs flat and freezes at the same rate.
Blanch vegetables and pre-freeze soft items
Most vegetables keep better in the freezer when blanched and cooled first, which the freezing guide walks through. Tender items like berries and tomato pieces freeze best when spread on a tray first.
Dry everything before it goes in the bag
Pat the produce dry or let it air dry. Moisture along the seal edge weakens the seal, and loose liquid can be drawn toward the pump, so keep the bag and the produce as dry as you can.
Fill the bag with room to spare
Leave a few inches of empty bag above the food so the sealer has a clean strip to work with. Lay the contents flat, and wipe the open edge of the bag if anything splashes on it.
Seal, then check the seal
Run the sealer and look for a flat, even seal with no wrinkles or gaps. For delicate items, a pulse function gives you control over the vacuum pressure so tender pieces are not flattened.
Label the bag and get it cold
Write the contents and the date on the bag before it goes into the freezer or refrigerator. Lay bags flat in the freezer so they stack neatly and are easy to find when you plan a meal.
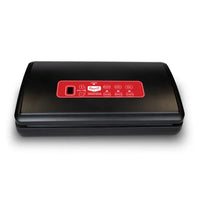
A 230 W countertop sealer with a digital display, touchpad controls, adjustable seal time, and a pulse function for delicate items. It has a built-in roll holder with a cutter and seals bags up to 11 inches wide.
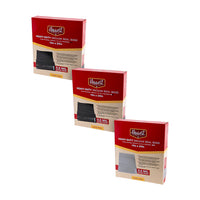
A 50-count box of precut 5.5 mil bags with a textured, vacuum-specific surface, made from BPA-free, FDA-compliant material. They work with The Harvest Company sealers and come in clear, clear and black, or all black styles.
Three habits behind a weak bag or a flat harvest.
Each one is a small prep or storage change, not new gear.


Five things to remember.
- 01Vacuum-sealed fresh produce still belongs in the refrigerator or freezer, never at room temperature.
- 02Blanch most vegetables before freezing, and dry all produce before it goes into the bag.
- 03Pre-freeze soft items on a tray so they keep their shape under vacuum pressure.
- 04Leave a few inches of empty bag above the food and keep the seal edge clean and dry.
- 05Label every bag with the contents and the date, and keep the freezer at 0°F.
Questions or notes? Drop them here.
A real grower replies within a business day.
No comments yet. Be the first.